The super low cost computer called the Raspberry Pi is mind-blowing and awesome. As TechCrunch recently reported, the $25 to $35 mini computer on a circuit board is designed to give kids around the globe an easy way to learn computer programming. But the Raspberry Pi is not like a computer you get from Apple or pickup at the local Best Buy. It’s not as simple as plug and play. It takes a bit of extra work and time. And you need to be a hacker before you can get it working.
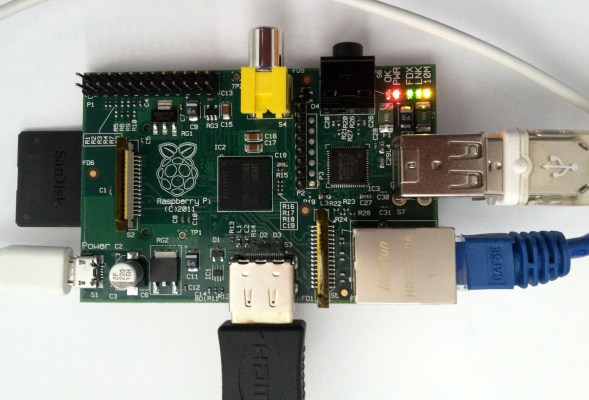
I got my hands on one of the 400,000 units that have been sold. The first thing I noticed is the Raspberry Pi is sold with no accessories. You get just the circuit board as seen above, without any of the connections. The Raspberry Pi Foundation, the British-based not-for-profit charity that makes the computer, says it wants to keep the price down, perhaps even $20 one day. But to keep the price down, they had to make some hard choices about what hardware and interfaces to include.
While a $25 to $35 computer makes a nice headline, the odds are good it’s going to cost you several times that amount to get it going. That full amount is still insanely lower than the price of a new PC or Mac.
You will need to connect a power supply, monitor, USB keyboard, mouse, SD memory card, and an Ethernet connection. If you want to get fancy, you might also find a box to hold it and attach all sorts of sensors, displays, and almost anything you can think of. No soldering is required to get the basic system running.

Diagram by Paul Beech and via raspberrypi.org website
The distributors selling the Raspberry Pi also sell some of the needed accessories, but they are in high demand and short supply, just like the circuit board itself. So, I decided to get started using parts I already had at home.
I had online help from the quick start guide on the RaspberryPi.org website, their wiki and support forums.
Power
I started by searching for a power source as no power cable is included. The quick start guide says you need to find a “Micro USB power supply – make sure you use a good quality one, capable of providing at least 700mA at 5V. Do not attempt to power your Raspberry Pi by plugging it into a computer or a hub.”
The Raspberry Pi makers say they picked the Micro USB jack for its ubiquity, saying it was chosen by the major mobile operator trade group, GSMA, as the Universal Charging Solution. Micro USB is also the standard charging port in Europe and it’s used on Android phones in the US.
As a big Mac user, I use a lot of USB chargers, but they have an Apple Dock connector on the other end. Not Micro USB. I read on one of the support pages that the power supply on the Amazon Kindle, which terminates with a Micro USB plug, could work. Looking at the fine print on the power adapter, it read “Output: 4.9V and 0.85 A.” It wasn’t the 5V in the spec but it sounded close enough, and 0.85 A was greater than the 700mA spec. Whether or not it was a “good quality one”, I had no idea.
This power supply did get the Raspberry Pi LED’s to light up. And it did work for a bit. But after everything was connected, my keyboard repeated letters (such as “EEEEEEEEEEEE” ) even though I touched the “E” key once. Other keys wouldn’t work at all. At first I suspected a bad keyboard, but after searching for “repeating keys” in the help forum and reading 45 results and the wiki, I learned the keyboard problem was likely due to the power supply. According to the wiki “common symptoms of an inadequate power supply are unreliable ethernet or keyboard operation … and SD card errors at startup.”
In order to tell if my power supply was inadequate, the wiki suggested I get out my multimeter and read the voltage across two test points on the circuit board. I don’t remember having to do that on any of my other computers.

With the Amazon Kindle power supply, I got a reading of 4.62 volts. The wiki said I should see a voltage between 4.75 and 5.25 volts and “anything outside this range indicates that you have a problem with your power supply or your power cable, or the input polyfuse F3.” I took a chance and decided I needed a better power supply and not a new input polyfuse F3, whatever that is. After hunting around the support forums, I found what I hoped was better power adapter for $10 and ordered it on Amazon. Using the new power adapter with the Kindle USB to Micro USB cable, I get a reading of 4.92 volts and the Raspberry Pi works much better.
Monitor
The video output from the Raspberry Pi is either HDMI or composite video via an RCA jack. I have a monitor with HDMI inputs and a spare HDMI cable so this wasn’t a problem for me. But, you can’t connect to a monitor using VGA, which many users might first try. The Raspberry Pi FAQ says “there is no VGA support, but adapters are available, although these are relatively expensive.”
According the the FAQ, the reason there is no VGA support is “the chip specifically supports HDMI. VGA is consider to be an end-of-life technology, so supporting it doesn’t fit with our plans at the moment.” The Raspberry Pi Foundation is hoping many of the students it’s trying to reach may have access to an old TV to use as the display since many of them have composite video input RCA jacks. I tried using the composite video mode on a tv and while the picture wasn’t as crystal clear as the HDMI method, it was workable.
USB Keyboard & Mouse
Finding a USB keyboard and mouse was pretty easy. But, if you don’t have one, those keyboards are pretty cheap, but they are another small expense.
SD Memory Card
You will also need a SD card to store the operating system and your programs and data. It’s a clever memory solution and SD cards are easy to get.
I used a 2GB card, but I’m running out of room, so I plan to upgrade to a 4GB card or greater. The FAQ says “we have tried cards up to 32GB and most cards seem to work OK. You can also attach a USB stick or USB hard drive.”
The default operating system for the Raspberry Pi is Debian, a version of Linux. I quickly learned you can’t simply copy and paste this software to the SD card from a computer. (Note: While I could have bought a SD card with the OS pre-configured, there is an order backlog own them and it was more fun to try this myself.)
I downloaded the special “Raspbian wheezy” version of Debian, which is recommended for those just starting out. Once downloaded from the Raspberry Pi website, the wiki gave me instructions on how to copy the image to my SD card by hooking it up to a card reader and my Mac. There were 12 steps including typing commands in the terminal program like this:
sudo diskutil unmount /dev/disk3s1
sudo dd bs=1m if=~/Downloads/debian6-19-04-2012/debian6-19-04-2012.img of=/dev/rdisk3
There were also some scary warnings, which basically said I could erase my entire Mac computer if it made a mistake.
Using the device name of the partition work out the raw device name for the entire disk, by omitting the final “s1” and replacing “disk” with “rdisk” (this is very important: you will lose all data on the hard drive on your computer if you get the wrong device name).
A recent update to the wiki instruction page includes a “mostly graphical interface” method, compared to the original command line method, to copy the image to your SD Card. Still, you need to run the terminal and this command:
sudo dd if=path_of_your_image.img of=/dev/diskn bs=1m
Once the operating system is loaded on the SD card, you can insert it into the slot on the Raspberry Pi and hopefully it will boot up.
The first two times I tried this, I got fatal errors and the Raspberry Pi would freeze. Some of this might have been due to the power supply problem described earlier.
One time, the red power light came on but the Raspberry Pi wouldn’t boot. I found a suggestion in the support forums to remove “the ._.Trashes .Trashes/, .fseventsd/, … that OS X put on the card, and all is well.” I put the SD card back in the card reader, attached it to the Mac and fired up the Terminal program and used some basic Unix to remove these files, using commands like rm filename. When I put the SD card back in the Raspberry Pi, all was indeed well.
Seeing the Raspberry Pi start up successfully brought on a proud sense of accomplishment.
Ethernet Connection
To get full use out of the Raspberry Pi, I plugged it into an Ethernet LAN cable and had no problem getting online. You can also get it connected to the Internet using a USB Wi-Fi or wireless adapter.
Software & Browser
When the Raspberry Pi boots up, it will start in command line mode. Here’s what you should see:

Then, I launched its graphical user “X window system” by typing startx at the command line.
Here’s what you get:

The operating system comes with the Midori web browser installed. Here’s what the TechCrunch site looked like:

I also installed the Chromium browser. Here’s TechCrunch in that browser:

But be prepared for the pages to load extremely slow.
What’s Next
The Debian operating system comes with Python pre-installed and it’s the recommended default educational programming language. With just one command line of text, I was able to install PHP. You can run a web server or a media server from the Raspberry Pi. You can install WordPress, the software that powers TechCrunch, on it. You can blink a single LED or create an amazing 8x8x8 LED Cube. If you are a gamer, you can run Quake III, as Devin Coldewey wrote on TechCrunch last year. And so much more.
As the Raspberry Pi team writes “We don’t think that the Raspberry Pi is a fix to all of the world’s computing issues; we do believe that we can be a catalyst. We want to see cheap, accessible, programmable computers everywhere.”
After getting started with the Raspberry Pi, I’m excited to see what I can do with it. I think the mission of the Raspberry Pi Foundation is a very worthy goal. And they are achieving this goal around the world today. But I fear the current setup requirements might discourage some students, parents, and teachers. I’m sure the team and the developer community is working on this too.